Monday, November 19, 2012

Lion


King of the Jungle

  
Teacher Sample

This could be a great project for any elementary grade.
For my Preschoolers, I choose to make a stencil of the basic shape of the lions head.
The hardest thing was to get them to paint a large long paint stroke to go off the paper.

I saw this project on pinterest. thank you to the unknown person who created it.

Here is a few of our king of the Jungle's


I used this lesson to review primary and secondary colors.
I have a student who is 4 (almost 5) and has exceptional control of her fine motor skills. She choose to add gold glitter paint to her mane! check out her lions eyes.... wow
  

I also brought in a few pictures of lions with large manes.
 love the bold colors on this one.


All you need is water color paper, black permanent makers and Tempera paint.

Monday, November 5, 2012

Scarecrow


Harvest Scarecrow 
Oil Pastel / Watercolor
Resist  Art Lesson

Kindergarten


Teacher's sample.
What you will need: 
12 x 18 white construction paper.
Oil pastels
 Blue water color 
large paint brushes (for sky wash )
Pencils
Black permanent maker
Raffia ( for hay )
Black paper for crow.  
scissors
glue

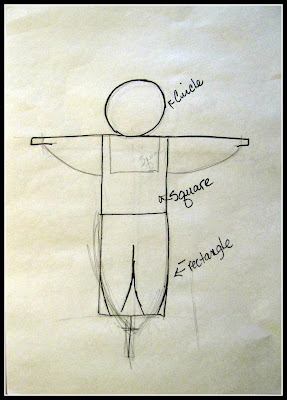
This was a great oil pastel resist project. We started out with a drawing lesson. The kids sketched their scarecrow in pencil first. I started with a simple lollie pop shape.


I continued with simple shapes to create the scarecrow.


Once the project was broken down to easy steps, the kids could now add their own details.
They did a wonderful job! Considering a few where skeptical at first. I remind them...with out practice you can't draw.  Here is a few of our kindergarten scarecrows.


First drawn with pencil. Then traced with black permanent maker.

Kitty scarecrow 

Next the kids colored in with oil pastels. They then used a watercolor wash for the sky. Painting over the entire picture to watch the watercolor resist the oil pastels.

Then girls decided they wanted their scarecrow to be a girl. We talked about how the dress would be tied at the bottom to hold in the hay.


Most the scarecrows look like they made friends with the crows!


Pirate Scarecrow...Great!

Happy Halloween.. Boo!

Monday, October 22, 2012

An Apple a day....


Apples Apples and more Apples


A fun project for pre-school and Kindergarteners. I started by bringing in several apples cut in half.
I chose only the red apple to reflect the project. We talked about the color of red on the skin of the apple and the color of the flesh. How many seeds do you think is in a apple? The response was quite interesting.


You will need :
white constuction paper
Red construction paper
newspaper torn into pieces.
Glue
white and yellow paint or cream color paint.
a cut out leaf
sticks
black paper.

Cut out white paper in the shape of an apple.( I made a stencil )
Cut out red skin of apple like a frame around the apple.
I used slightly watered down glue mixed with paint to match flesh color of apple. 
Next have the kids stick the newspaper pieces on the white apple decoupage style using the glue mixture. I had my preschoolers use foam paint brushes. The glue mixed with paint worked great. It simplified the use of glue for the young kiddo's. 
Next add the red frame and glue the seeds. 
Have the kids color a leaf or two, glue on. Add stick to represent stem! all done.

 If you have the time...I thought how cute it would be to sew a black zig zag down the center of the apple.. maybe next year.

Note: I had to do a lot of the prep work for preschoolers. Most kindergarten and older can cut out and tare paper.

Wednesday, October 10, 2012

Van Gogh


Van Gogh Sun Flowers


I introduced water color paper to the kids this week. We painted a blue wash and added texture. For the texture, I had the kids drag a rubber texture tool though the paint. This made wavy lines through the paint.
Next I brought in leaves. The kids painted the back side of the leaf and printed onto the blue background.


The kids then glued newspaper as a table top for the vase. I had them use watercolors to paint the newspaper. Next: add the vase. they traced a vase stencil and cut it out.
Next placed the brown felt sunflower centers. Leave room for the petals!

This project was done in two art sessions.
Here is a few from my Kinder Kiddo's


Can you tell we talked about highlight and shadow?


I love this one! He added fallen leaves and seeds.


I love the different out come of each child's art.


 Great Job Kiddo's !

Monday, July 23, 2012

Color wheel

Oct. 8th 2012

It took me awhile, but I'm back !. School has started and I'm a little behind on posting anything.
As some of you know I teach Pre-School and Kinder-kiddos art classes. On occasion privet lessons as well. I have three classes a week this year. All full ! They will certainly keep me busy. I'm in week 4 of teaching. Here is what we have covered so far.


Color Wheels

I start with the color wheel every year.
Cut out card board or manila folders work well also, 7 1/2 inch diameter.
To insure the young ones follow the correct pattern of colors, I put a dot of paint in each section.
I start with the primary's. Have them find the yellow paint dot and paint that slice yellow. You get the idea...same with secondary colors.
Set aside to let wheels dry.
With the left over paint in their pallets, I have the kids mix colors on a blank piece of paper. oh what fun.
Next lesson: glue craft items to corresponding colors. The kids and I chat about the different shades of each color.

After the kids were all done, I gave them primary colored playdough. I had them mix their secondary colors. The young kids aren't usually strong enough to mix well.
Have them try to roll two colors together like a snake. Then smash it into a ball again. repeat several times. Or smash onto table top fold and smash fold and smash. The young ones are always astonished as a new color starts to appear. 


Tuesday, June 12, 2012

Poitillism


French Modern Artist George Seurat 
Pointillism

George Seurat
 A Sunday Afternoon on the Island of La Grande Jette
This painting took Seurat two years to complete. 1884-1886


My students had been asking to do a pointillism project. So this is what I came up with...


A clown fish.
I felt the contrast was nice. I tried to keep it simple so the kids didn't get frustrated.
I started with a little experiment. I had the kids use fine tip markers. On a small scrap piece of white paper, make many yellow dots. Then blend red dots.... back away and VOILA ! it looks orange. 
We practice mixing by dotting our primary colors to get our secondary colors. pretty cool.

What you will need:
 5x7 or 6x8 canvas panels.
Markers- Crayola washable thin markers work best.
Fish stencils. 
Penciles 
White erasers or gum erasers.
Samples of George Seurat's work
Sample pictures of clown fish

 
Get started
1. Have the kids draw their picture. KEEP IT SIMPLE.
2. I have quite a few Pre-school and kindergartners. I made clown fish stencils out of scrap watercolor paper or manilla folders work very well for making stencils too.
3. Introduce George Seurat. What is Pointillism?
4. I brought in samples of his work. 


I drew on the stencils so the young kids had a visual guide.


As they start dotting remind them to press gently with the markers!
Hint. use light colored markers first, it will help keep light markers clean.


Kids never cease to surprise me.. Even my pee wees did a fantastic job. 


I cut little frames out of black construction paper.


Just keep swim-in!


Wednesday, May 30, 2012

Foil Abstract Art


My Students had a great time with this project !
Lots of smiling faces when they were done.


What you will need:

 Lots of cardboard cut into geometric shapes.
 11x14 size card board. 
 Note: I save the back cardboard piece that comes with the purchase of  Strathmore watercolor paper.
 Its strong and heavy. Perfect for this project.  Any cardboard will do.
 Semi small nuts and washers med. and large. (hardware store)
 LARGE string.(hardware store)
 Heavy duty foil
 School glue
 Black shoe polish  and or black oil pastel. I used Black oil pastel.
 Scissors
 Acrylic Paints or metallic craft paints. I used metallic craft paints.


 Start by arranging  pieces where you think they look good. 
When your happy with your arrangement, start gluing.


Next, glue surface. Carefully crinkle foil and place it down over the top of geometric shapes.
Start in the center and gently press foil over the entire piece,
working and pressing foil into all edges. If foil tears, no worries. it won't show by the time your done.


Now trace all items with black oil pastel.
You can also use black shoe polish to rub lightly over the entire foil surface.
This will allow the acrylic paint to stick to the foil.


Start painting.
Several affects can be achieved.
 Metallic paints used lightly will make the finished piece look more like metal. Altho, this was what I was aiming for....  kids that used heavy paints produced a more cheerful feeling.
I love the way they turned out !


Amazing. The same project. So many different interpretations.  


Wow.. this one was a lot of work.. good job Lucas!


Thursday, May 17, 2012

Mother's Day Pop Up Cards


Mothers Day Pop Up Cards
by my Kindergartner's
After school Art


A fun and simple little project that requires a little prep work.


 What you will Need:

Scrapbook paper
Double sided tape or glue stick
Value pack cards or you can cut your own cards out of card stock.
Acrylic paint
Ribbon
Foam Mounting dots- optional.

Choose scrapbook paper suitable for the background of the handprint. Using acrylic paint, make handprint of child's hand onto the paper. let dry.
 Cut song page paper to 4 1/2" x 6". Adhere to the card, centered, using double sided tape or glue stick.
Cut out handprint to approximately 3 3/4" x 5". Adhere to the center of the card using tape or glue. For added affect try adhering handprint using foam dots.
Slide ribbon under the handprint page and tie a knot. Trim the ends of the ribbon.


My students made a pop-up mothers day note in side the card!


I brought in a heart stamp and 3-D small butterfly's to decorate with.


When we where all done, 
we put the cards in their envelopes and added a chamomile tea bag for mom!


       Happy Mothers Day!


Sunday, May 13, 2012

 Clay Chinese Dragons


The above Dragon was found on pinterest. Thank you for the inspiration.


You will need 8 x 10 cardboard
air dry clay
acrylic paints
pencils
small sponges
paint brushes 
water bowls for making slip.
SLIP: Clay slip is basically clay mixed with water, it's like paste.
Scoring is when you take a scoring tool (has a needle like tip) and you scratch the surface of the clay your working with, usually using a hatching technique (making X's).
After your done scoring the area of your clay where you want to attach another piece of clay. You score the other piece of clay and had slip.
You attach the pieces of clay together and then smooth the pieces together.


Start by rolling a coil of clay. then shape into a "S" like shape. Shape the head. Add wings, eye's, a tail with spikes, nose, or anything your imagination can think of. Let dry. Paint the cardboard as the back drop for the dragon.

This on is done by one of my kinder kiddo's. He does everything fast. I'm always amazed at how well his projects turn out:)  After the dragon is dry ( 3 or 4 days ) paint the dragons and glue then to the cardboard.

This little dragon is slithering along the flowers. Queen of her garden. notice the crown on her back!
OK. I admit the photographer was having a little trouble. But I just had to post this one. It almost looks like a real snake. The kids used the eraser part of a penile to make the scales.


This Blue beauty is guarding her newly hatched dragon-ettes! Well done kids!